Sick leave
Submission and approval
An employee can submit a new sick leave notification on Integrata’s service platform, either via the mobile app or browser. A medical note can also be conveniently submitted at the same time.
Depending on the enabled features and integrations, employees can:
- Submit a sick leave notification
- Upload a medical note
- Upload an employment-related document
- Upload another type of document
- Edit rejected or pending sick leave periods
If a manager approval flow is in use, managers can also submit notifications on behalf of their subordinates via the browser interface. The process is identical to submitting one’s own notification, with the exception that the manager selects the team member from a dropdown menu.
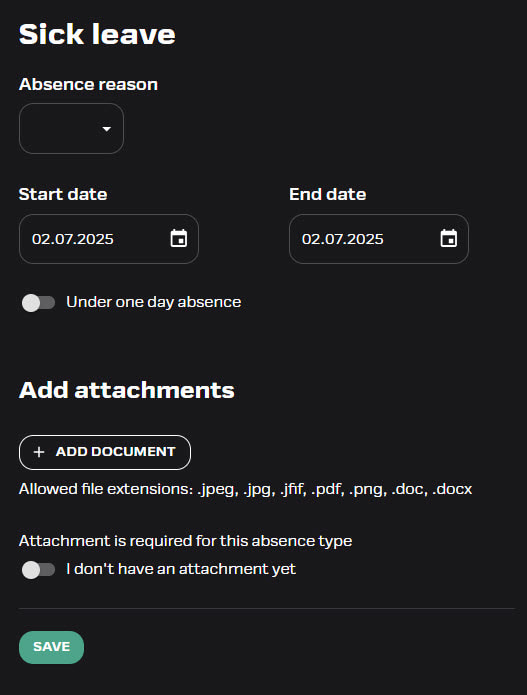
New sick leave
You can find the “Sick Leave” function on the home screen of the mobile application or in the browser’s list of functions. Fill in the required details in the form fields:
- Reason for absence – choose from the dropdown menu.
- Period of absence – enter the start date and end date.
- If the absence lasted less than one day, activate the toggle and enter the time.
- Save the notification.
- If an attachment is required, upload the file from your device or add it later using the mobile app.
- If you do not yet have the required attachment, activate the toggle “I don’t have the attachment yet”.
- The app will start sending reminder messages after three days if the attachment is still missing and the transaction has not yet been processed in the approval flow.
Editing and rejection
You can edit a submitted or rejected transaction in the browser app.
- If an attachment or absence period is rejected by the manager, the user will be notified separately.
- If necessary, you can also reject the notification yourself in the browser.
- It is not possible to edit an approved transaction, and no attachments can be added after approval.
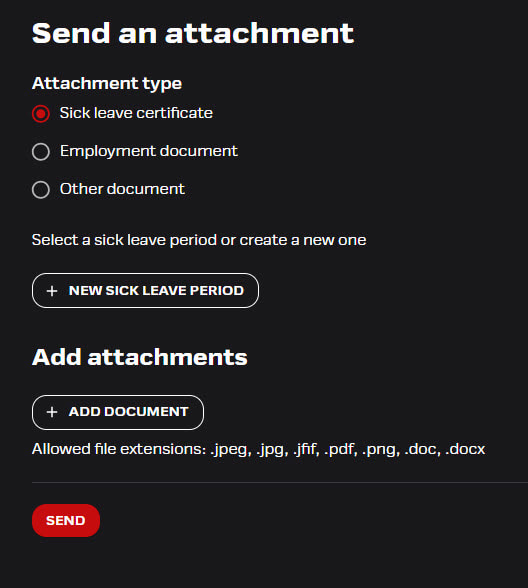
Submitting attachments
Attachments can be submitted along with the absence notification or separately afterwards. If your company has enabled submitting other types of attachments, you can find these options under Other Attachment (mobile) or Attachments (browser).
- To add an attachment in the browser app, click the “Add Document” button and upload the correct file from your computer.
- To add an attachment in the mobile app, either take a photo or upload a file from your phone’s gallery.
Adding attachments afterwards
- Attachments can still be added to absence periods that are awaiting approval.
- To add an attachment to an already submitted absence, select the “Other Attachment” button in the mobile app or the “Attachments” function in the browser app.
- Select “Sick Leave Certificate” and then select the desired absence period from the list.
Approvals view
If an approval workflow is set for sick leave notifications and attachments, the manager acts as the approver. The HR role can be granted access to manage approvals on behalf of managers in a dedicated view.
- Transactions awaiting approval can be processed via the mobile app or browser.
- The browser’s “Pending Approvals” view also includes other items awaiting manager approval.
- If necessary, the manager can edit the event information in the browser.
- Approvers see a warning if an employee has submitted an absence without a required attachment. The absence may be approved at the approver’s discretion, but attachments cannot be added after approval.
Notifications and reminders
Managers and their substitutes always receive push notifications and emails about new absences requiring action.
- Managers and their substitutes will receive reminder messages about unapproved sick leaves or missing attachments if there are items awaiting approval for more than 7 days. After this, reminders are sent once a week.
- The employee will be notified if the transaction is rejected.
- Employees also receive daily reminders starting three days after submission if the absence is still pending approval and missing a required attachment.
Substitute management
Managers can assign a substitute for their absence in the browser application.
- You can find the “Manage Substitutes” menu in the top right corner under the profile icon.
- A substitute can be appointed for an indefinite period or for a fixed period.
- You can assign another user as a substitute. If the substitute is not a manager, they can only be approved in the browser application.
- The substitute can act on your behalf and receive notifications of new events.
- The substitute can also send attachments on behalf of your subordinate.
- You can have one or more substitutes.

Adding a substitute on behalf of a manager
The admin role has the right to add substitutes on behalf of a manager..
- Go to the “Personnel” menu and search for the manager by name.
- Open the user’s card, and add the substitute on the “Substitutes for this manager” tab.